
A tie is an accessory that can greatly improve a smart casual outfit. It makes you look more sophisticated and fashionable whether you rock it with a shirt or a full suit. There are jobs that require you to wear a tie, and this might be the reason why people do not like wearing ties in casual environments. However, a tie looks stunning when worn with a causal outfit mainly because not many people wear one with their casual clothes. If you want to rock a tie on a first date or on a night out, here are some tips on how to tie a tie.

How to Tie a Tie Step by Step
Tie a Full Windsor Knot
This is the easiest and most traditional way to tie a tie. This works quite well with thick fabric ties. It forms a symmetrical triangle that boosts the confidence of the wearer. It is mostly worn in formal and semi-formal events by politicians and other officials.
A step by step guide:
Lay the tie on your neck with both ends hanging at the front with the wider end on your right (or left depending on your preference).
Adjust the tie such that the wider side is longer by a foot compared to the other end.
Pull the wider end over the narrow end and bring it back under the narrow end. Pull it through to form a loose knot.
Lower the wide end below the narrow end and bring it over the knot you created in the previous step.
Pull the wide end back through the knot.
Take the wide knot across again and pull it behind the knot.
In between the layers of the knot, tuck the wide end and adjust the knot to give it a proper fit.
Tie a Half Windsor Knot
It is similar to a full Windsor knot, but is easier to tie. It’s faster and better suited for ties with lighter fabric like silk. It is a good fit for daily wear and when you are in a hurry.
How to tie it step by step:
Lay the tie on your neck with both ends hanging at the front with the wider end on your right (or left depending with your preference).
Adjust the tie so that the wider side is longer by a foot compared to the other end.
Pull the wider end over the narrow end and bring it back under the narrow end. Pull it through to form a loose knot.
Take the wide end across the other end and pull it up at the back of the knot.
In between the layers tuck the wide knot and adjust the knot to give it a proper fit.
Tie a Four-in-Hand Knot
Also known as a school boy knot, four-in-hand is the easiest for beginners. If you want something quick and simple, it is the ideal choice.
How to tie a tie step by step:
Lay the tie on your neck with both ends hanging at the front with the wider end on your right.
Adjust the tie so that the wider side is longer by a foot compared to the other end.
Take the wider end and pull it across the other end.
Bring the wider end beneath the other end and wrap it over again.
Take the wide end upwards behind the wrapped part of the tie.
Tuck the wide end under the first wrap of the knot and pull it down and adjust the knot to give it a proper fit.
Tie a Kent Knot
This is a modified four-in-hand knot. It is perfect for thick ties worn with shirts with narrow collar spreads. It is a good idea for tall and big men wearing regular length ties.
How to tie it step by step:
Lay the tie on your neck with both ends hanging at the front with the wider end on your right.
Adjust the tie so that the wider side is longer by a foot compared to the other end.
Cross the wide end behind the other end.
Taking the wide end, form a loop over the narrow end.
Place the wide end between the tie and your neck and pull it downwards.
Adjust the knot to give it a proper fit.
Tie a Prince Albert Knot
A Prince Albert knot is similar to a full Windsor knot. The only difference is the knot is wrapped in the same direction giving it a more asymmetrical shape. It is perfect for thick ties and shorter men.
How to tie a tie step by step in this case:
Since it needs 2 or more wrappings, the wider side should hang much lower than the narrow side.
Wrap the narrow end with the wide end. Do this 2 or more times. The more you wrap the thicker the knot.
After the final wrap, create a loop and pass the thick end in the loop and pull it downwards.
Adjust the knot to give it an appropriate fit.
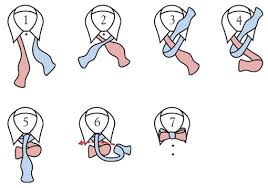
Tie a Bow Tie
A bow tie is a classic for any evening events, be it a date or a corporate diner.
How to tie it step by step:
Adjust the length so that the right side is slightly longer than the left side.
Cross the long end over the short end and pass it through from the back forming a V.
Form a front loop of the bow by doubling the short end and stationing across the tips of your collar.
Holding the front loop that you have just formed using your index finger and thumb, drape the long end over the front and double as you did with the short end.
Bring the bow on your right to the bow on your left and pass it through the opening in between.
If there are any loose ends, you need to tuck them in the loop behind the knot that has been created by the previous steps.
Adjust and tighten your bow.
View All Comments /Add Comment